# Merchant Detail View

In the platform administration of your Payrexx account, navigate to **Merchants** and search for the desired merchant. For more information on using the merchant overview, please refer to the article [Overview and Editing](https://docs.payrexx.com/platform/english/backoffice/merchants/overview-and-editing).

## Opening the Detail View

There are two ways to open a merchant’s detailed view:

<div align="left"><figure><img src="https://13947520-files.gitbook.io/~/files/v0/b/gitbook-x-prod.appspot.com/o/spaces%2F-McKWr2N1ZENCggMlAH5%2Fuploads%2FpmwckU3y0t2ZXOVFNePC%2Fimage.png?alt=media&#x26;token=0f32f821-92d0-4ec4-89f9-0c0c623861d1" alt=""><figcaption><p>Opening the merchant detail view</p></figcaption></figure></div>

1. Click anywhere in the empty area of the row.
2. Click on the eye icon.

## Using the Detail View

The detail view is divided into the following sections:

* [General information](#general-information)
* [Subscription and invoices](#subscription-and-invoices)
* [Payouts](#payouts)

### General Information

In the first section, general information about the merchant account can be viewed:

<div align="left"><figure><img src="https://13947520-files.gitbook.io/~/files/v0/b/gitbook-x-prod.appspot.com/o/spaces%2F-McKWr2N1ZENCggMlAH5%2Fuploads%2FGWvHP7bGazU8PZHcM7f8%2Fimage.png?alt=media&#x26;token=746c2b6b-0717-465a-9061-1054772edd5d" alt=""><figcaption><p>
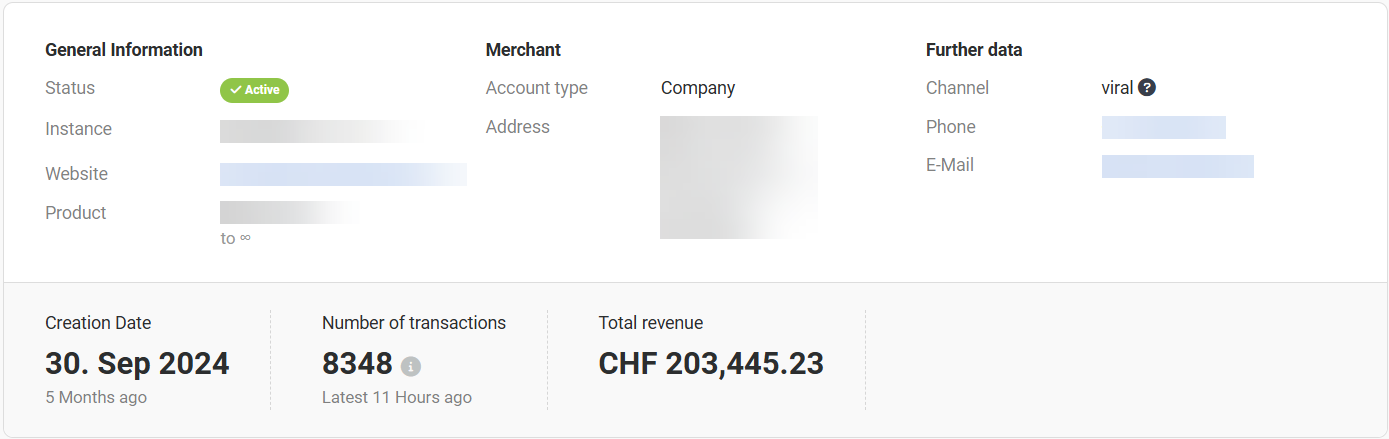
General information in the merchant detail view</p></figcaption></figure></div>

### Subscription and invoices

This section covers the subscriptions and invoices of the selected merchant:

<div align="left"><figure><img src="https://13947520-files.gitbook.io/~/files/v0/b/gitbook-x-prod.appspot.com/o/spaces%2F-McKWr2N1ZENCggMlAH5%2Fuploads%2F6XuzKSEqP4Ket2U4tRl1%2Fimage.png?alt=media&#x26;token=5a6dfb0e-c1ae-4f08-8469-ba624594975a" alt=""><figcaption><p>
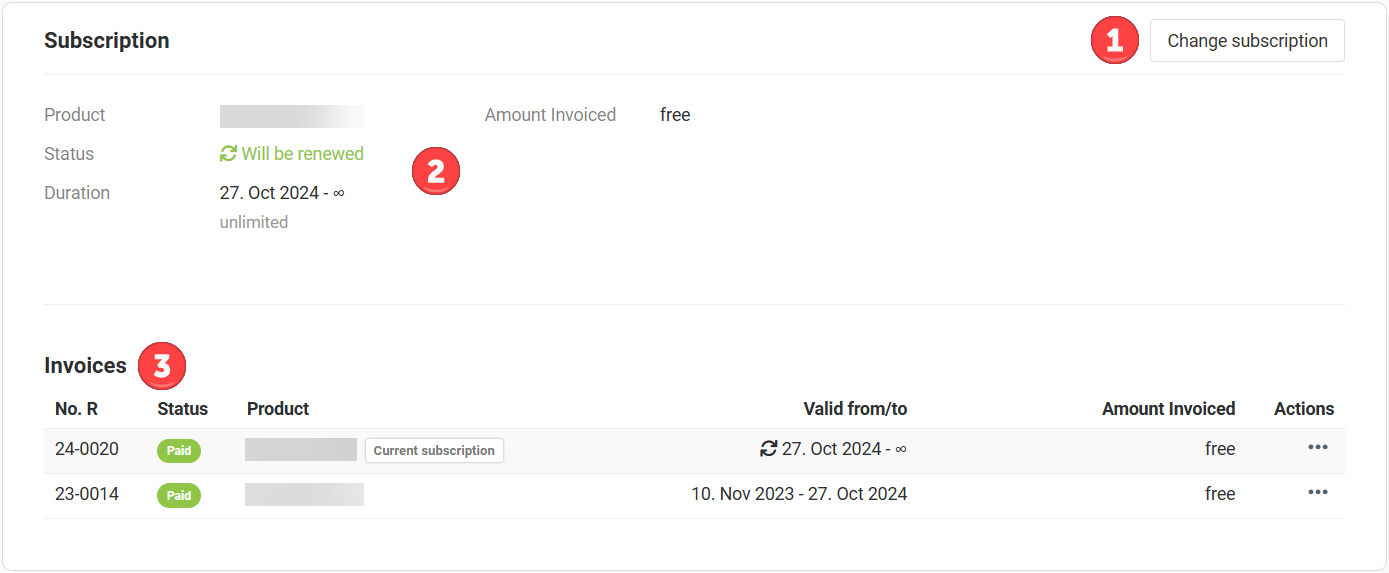
Subscription and invoice information in the merchant detail view</p></figcaption></figure></div>

#### 1. Changing the subscription

Click the white "Change Subscription" button to activate a different plan for the merchant. The following window will open, allowing you to enter the merchant’s new subscription:

<div align="left"><figure><img src="https://13947520-files.gitbook.io/~/files/v0/b/gitbook-x-prod.appspot.com/o/spaces%2F-McKWr2N1ZENCggMlAH5%2Fuploads%2FIXnYevMYxAkUQKEbx3uf%2Fimage.png?alt=media&#x26;token=2e200d79-bc80-47d8-99f5-089c03e63779" alt=""><figcaption><p>Creating a new subscription for a merchant</p></figcaption></figure></div>

1. **Plan:** Select one of the [plans](https://docs.payrexx.com/platform/english/backoffice/admin/products/product-overview) offered on your platform.
2. **Runtime:** Set the duration of the plan.
3. **Base price:** Use the plan’s standard price, set a custom price, or offer the plan for free by activating the checkbox.
4. **Start:** Define whether the subscription becomes active immediately or from a specific date.
5. **Internal note:** Optionally, add an internal note. The merchant will not see this note.
6. **Summary of old subscription:** Click the black triangle to view an overview of the merchant’s previous subscription.
7. **Summary of new subscription:** Click the black triangle to view an overview of the upcoming subscription.

To create the new subscription, simply click the green **"Save and Send Invoice"** button at the bottom of the screen.

{% hint style="info" %}
If you want to create the subscription without sending an invoice, click the small white triangle on the button, which will provide the option to create the plan without sending an invoice.
{% endhint %}

#### 2. Subscription

The "Subscription" section displays the key details of the merchant’s current subscription.

#### 3. Invoices

The "Invoices" section lists all invoices previously sent to the merchant. When you hover over the three dots in the Actions column, a PDF icon will appear. Click it to download the invoice.

### Payouts

This section lists all completed [payouts](https://docs.payrexx.com/merchant/english/account/payouts) (green status) and scheduled payouts (orange status):

<div align="left"><figure><img src="https://13947520-files.gitbook.io/~/files/v0/b/gitbook-x-prod.appspot.com/o/spaces%2F-McKWr2N1ZENCggMlAH5%2Fuploads%2FMGC0VyeEltFGSbQwS9S1%2Fimage.png?alt=media&#x26;token=3519c782-d008-486e-bda9-2e0600827582" alt=""><figcaption><p>
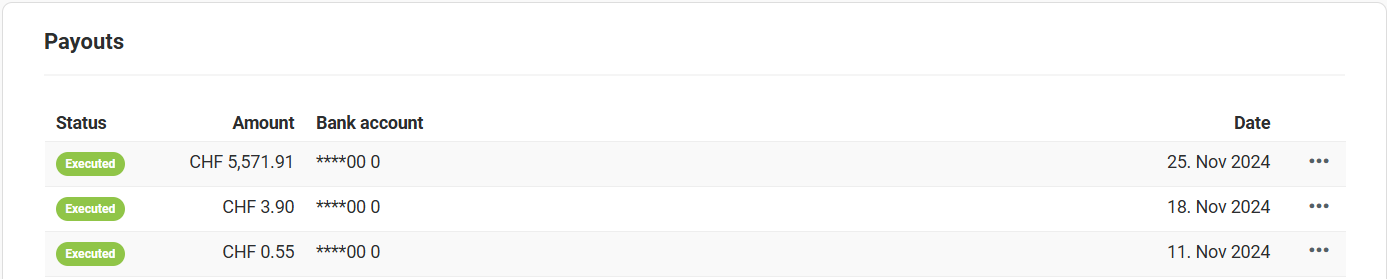
Payout information in the merchant detail view</p></figcaption></figure></div>

When you hover over a row, two icons appear on the right side, allowing you to:

* View the details of the respective payout.
* Download the payout report as an XLS, CSV, or PDF file.
